|
Ever come across an application where all that is needed is some indication the power is applied? Incandescents at mains voltages are a pain as they generate incredible levels of heat and neons, well, they just go black after a while. An LED would be perfect as they have proved their exceptional reliability. But there is no low voltage in sight (and the whole idea is to monitor the power, not some low voltage circuit!). A current limiting resistor at 230VAC, even with a super-bright LED running at 10mA, will consume a massive 2.3W (ok, you try to get rid of this sort of heat - safely!). There is another means to achieve the required current without dissipating heat - a series capacitor. At first it may appear to yield the same results, but running an LED from the mains with a capacitor is incredibly interesting. The first bit that needs to be understood is how the capacitor reacts with the mains. For ease, let us consider a 1µF capacitor (I like doing this, it makes the maths easier). From the textbooks we know the impedance of such a capacitor is 1/(2PiFC) = 1/(2 x 3.14 x 50 x 0.0000001) = 3185j (j =ohms reactive). At 230V this would mean a current draw of 72mA i.e. almost 17VA. But it is the 'j' that is often forgotten about.
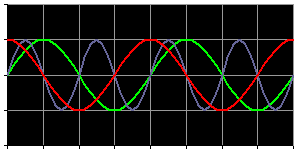
The current through the capacitor (red) will 'lead' the mains voltage (green) by 90º. Investigating the real power (real time V x A - dark blue), we'll see the energy is imported into the capacitor for half a half-cycle, and exported back into the supply for the other half a half-cycle. This means the capacitor, apart from losses, does not absorb any energy whatsoever (which is exactly why VA was quoted in the above result, and not watts!).
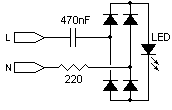
As for the LED; It must be remembered it will subject to the peak current. 1µF will prove, in most cases, to be a little too large (72mArms x 1.414 = 100mApk). Most LEDs have a max forward current of 60mA. A 0.47µF is therefore more suitable at 230VAC (100mApk x 0.47 = 47mApk i.e. 33mArms - now you see why I always work with 1µF first!). The 220W, ¼-watt resistor serves three purposes. The first is to act as a fuse should the capacitor fail. The second is to cater for harmonics and other imperfections of the mains waveform that are prevalent on modern-day mains supplies. The third to to buffer the LED against transients and the like. The value is chosen using the R=P/I² i.e. 0.25W/(33mA)² = 229W (closest available is 220W) The diodes can be any general purpose type capable of handling the full forward current through the LED. I've used 1N4148 with huge success (however, I found small 200mA bridge rectifiers were cheaper). Nothing is stopping you from using 1N4002 thru 1N4007, but the physical size just makes them cumbersome. The only power absorbed by the circuit is that required to light the LED and the small amount dissipated across the resistor. It is going to be about 250mW total and would take over 4000 hours to use 1kWh (I think most can live with that!). Also, most loads are to some extent inductive. Having a few of these Mains LEDs about will not only provide indication the mains is healthy, but also provide a little power factor correction thus doing its bit towards the Kyoto agreement! If you want the LED less bright, decrease the size of capacitor (do not increase the resistor to decrease the brightness). Then adjust the resistor accordingly using the formula 0.25/(I²). An example: A 150nF (0.15µF) will run the LED at about 10mA (enough for most applications, especially using super-brights). Increase the resistor to 2.2k.
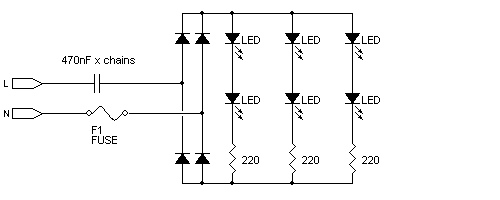
If you want to run in excess of say 10 LEDs (5 LEDs for 120V areas), then consider multiple circuits consisting of equal batches of LEDs. One can use a single cap to power all the LED chains, but each chain must contain its own resistor so as to ensure current balance and each chain must contain the same number of LEDs.
The reason one wants to limit the number of LEDs in series is the amount of "off time" the LEDs will have around the peaks of the waveform. This 'off-time' will impact the RMS current (and therefore the overall brilliance) of the LEDs while not impacting the peak current (and LED failure is more likely with excessive peak current as opposed to RMS current).
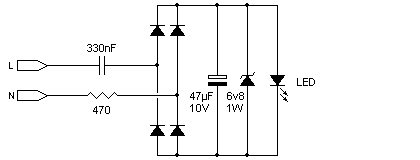
In the circuit below, two components are added to cater for this difference; There is a smoothing cap to help keep the supply voltage above zero while the supply current changes phase, and a zener to help regulate the output voltage while the LED is off and drawing very little current.
The above values were successfully used by myself on more than one occasion.
As with most things, there are a few catches. With this there are no exceptions, but knowing about the pitfalls can make this a most viable circuit. The lower the value of resistor, the less resilient the LED will be to noise, impulses, and harmonics on the mains. The more resilient circuit would be a 'super-bright' LED and a smaller capacitor as opposed to a normal LED and a larger cap (one achieves the same brilliance for lower current with the added advantage of higher reliability). If you're stuck having to feed the LED with a higher current, then consider increasing the resistor ensuring the power handling capacity is not exceeded (power dissipated is I² x R) Make sure the capacitor can withstand at least 1.5 x the peak mains voltage (i.e. about 500V for 230VAC). This is to ensure the cap does not break down even with transients that form part of a normal day on the mains. My preference is 630V caps. There have been reports of people getting a rather large 'sting' from this circuit when used as a 'night light' (not its intended purpose!) when uplugging it from the mains. Reason is, the capacitor remains charged and their hand completes the circuit. The cure is to take two 470k resistors in series (so as to form one 940k resistor) and place this across the cap. This will discharge the cap within a short space of time thus removing its sting. And finally: You are working with mains - please be careful.
© 17.04.04 / 03.05.07 |

 Now for the clever bit. My preference is to feed this current into a bridge rectifier (low-voltage, low-current versions are about as expensive as single diodes). This way the whole cycle is used to light the LED (many simply feed an LED fitted with a reverse protection diode thus only use one half of the cycle - what a waste!).
