|
Looking for a short on an inaccessible cable usually involves ripping up what ever it is covering the cable. However, if it is a single short, and you can isolate the cable, then there is a way to let physics do the work for you.
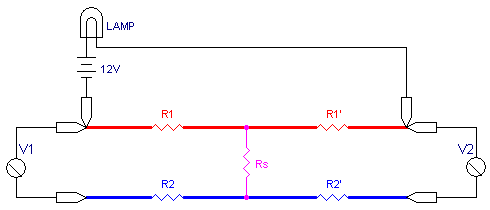
In the above drawing, R1 and R2 are the natural resistance of the wire. Rs is the resistance (if any) of the short. The resistance of each wire is split in to Rx and Rx'. Produce a current in the faulty cable using a reasonable sized 12V lead acid battery (car, bike, or even that used as battery back-up in an alarm system) and a 12V lamp. Complete the circuit via one of the shorted wires of the faulty cable. For electrical cables, use a decent sized globe such as a 60-100 watt car headlamp. Using a good quality digital multimeter, measure the voltage across the cable at the one end. This is, in effect, the voltage developed across R1 i.e. the wire from the beginning of the wire up to the short. Rs and R2 merely provide a path back to the meter and tend to not have any bearing on the reading per se. Now measure the voltage across the other end of the cable thus measuring the voltage developed across R1' i.e. the second portion of the wire. Calculate the distance from the beginning to the short on the cable using the simple formula: Ls = Lc x V1/(V1+V2) where:
Lc = length of cable V1 = voltage at beginning of cable V2 = voltage at end of cable Swap the battery and lamp to the second wire of the shorted cable and repeat the procedure as a validation of the calculations. If you've come close to the first result, then start searching for the short at or near the point you've calculated. Accuracy of this method is dependent on all aspects of the formula e.g. knowing the length and path of the cable, but also on the accuracy of the meter used and the voltage developed across the cable. Anything greater than 100mV across the cable (V1 + V2) tends to yield pretty reliable results.
The above method can fall flat when there are joints in the cable adding to the cable resistance, and especially if some of the cable run is a different cross-sectional area (the resistance per length changes).
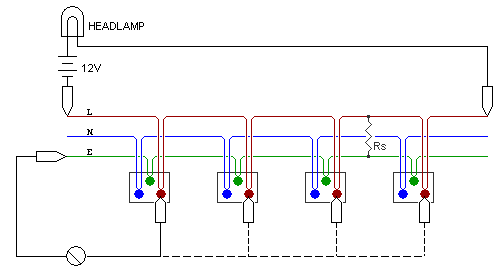
In situations like this, there is usually some form of periodic access to the cable (at least there should be!). In our example this is a ring circuit feeding a group of sockets. 'Rs' is again depicting the point of short, which may have resistance. Again, isolate the circuit, and create a current using the battery and lamp. This time, however, measure between the two wires involved in the short at the access points along the cable. You're looking for the point(s) with the lowest voltage. That which is lowest is closest to the fault. You can do this in two ways; Either attach one leg of the meter to the start of the cable and then, at access points, "wand" with the second leg on to the wire carrying the current, or, measure between the two affected wires at each access point. Accuracy of this method is dependent on the amount of voltage developed across the wire (more then 100mV tends to produce good results) as well as the quality of the multimeter. The higher the input resistance, the more accurate the results. Please note: If dealing with a ring circuit, you need to break the ring (but, then again, the ring allows access to both sides of the circuit with little effort!).
© 17.11.04 |