|
Joining CAT-5 cable is often done using two RJ45 connectors and a 1-to-1 coupler. This, however, means there are now two extra joins in the cable, each a possible place where communications can be disrupted.
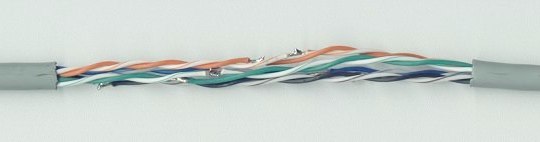
Above shows a spliced cable with soldered joints, before the splice is covered with a length of discarded sheath sliced down its length and slipped over the splice and then covered with heatshrink. If done properly, this cable has far less chance of corrupting communications as firstly the joint is soldered so contact pressure is not being relied on and, secondly, impedance is far less disturbed in this arrangement as would be using the traditional method inferred above. There are two basic requirements to getting this sort of joint right. Have a good soldering iron (yes, bad workman will blame their tools, but having a good soldering iron in the hands of a master means better artwork!), and to also have a ruler to measure the steps of the staggered joins (a step often left out of this type of splice resulting in loads more work!). Soldering is best accomplished by suspending at least one side of the cable in free space (using a desk vice or similar). During soldering, ensure you always maintain the twists as accurately as possible. Also keep cables colour for colour (unless, of course, you're doing some fancy splicing to create a specific cross-over or many cables in to one type arrangement). This method was used in abundance during a cabling operation when two LAN connections were being fed in to one cable (because of space restrictions) in a less-than-optimum environment where connectors would have lasted only a few months at best.
© 17.10.04 |