|
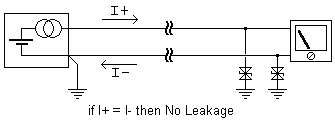
Any well designed 4-20mA loop is fitted with surge protection, either as separate devices or within the instruments in the loop. If this protection fails, or if the loop operates near the protection clamping voltage, current leakage occurs resulting in inaccurate and possibly non-linear readings.
Other current leakages can result from e.g. water ingress in a cable say between a sensor and an instrument. This is equivalent to the leakage current flowing through the protection diodes as shown below except in this case it is conduction through the water between the wire and earth. Another form of leakage is accidental grounding of a loop in two places.
The usual method of determining such leakage is to individually measure each leg of every device within the loop at various current levels through the 4-20mA range. This results in a highly labour intensive, time consuming, exercise. The circuit shown below can be used to determine 4-20mA analogue loop current leakage in the minimum of time.
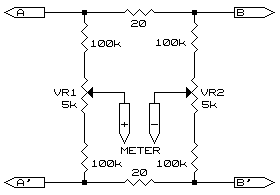
Calibrating the bridge is simple. Connect a suitable digital multi-meter (set to 200mV) to the bridge, short connectors B and B', apply 20mA through A and A', and adjust VR1 for zero reading on the meter. Now short A and A', apply 20mA through B and B', and adjust VR2 for zero reading. The bridge is now ready for use. To use the bridge simply disconnect the current source from the loop (note: the current source is what energises the loop and is not always the analogue output). Connect A and A' to the current source, B and B' to the loop (observing the polarity), and connect the meter. If possible manually adjust the current of the loop from 0 to 20mA and notice if a reading appears on the meter at any stage. If a reading occurs leakage is present. Adjust the loop current for the highest meter reading. One by one, fully disconnect the various pieces of equipment in the loop remembering to short the connections in order to retain the loop. The meter reading will fall to zero when the offending device is disconnected. Do not calibrate any instruments with the bridge in place as it will load the loop and errors in readings will result. Once the offending device has been removed or the problem corrected remove the bridge and reconnect the loop as normal and then perform any required calibration. Although the bridge will only cause reading errors with active analogue outputs i.e. those that both energise the loop and regulate the current on it, it would remain as good practice to remove the bridge before any calibration. All resistors are 1% metal film, VR1 & VR2 are multi-turn trimpots. | | Ask a Question | 03.11.00 |
|||
 Finding Current Leakage